Changing the exposure settings for Basler cameras
Exposure is the amount of time the camera spends acquiring a video frame. Raising the exposure permits more light to reach the camera sensor, brightening the image, while lowering the exposure reduces the amount of light, darkening the image.
The image brightness is also affected by the aperture setting on the lens (this is the adjustment ring on the lens marked open-close, turn it to Open to brighten the image), the gain setting of the camera, and the lighting. If the image is too dark, it's usually best to start by opening the aperture on the lens, but increasing the exposure can also be helpful. Also see My image is too dark using a Basler camera which covers exposure but also gain and the aperture setting on the lens.
Solution
1. Close your Noldus software (e.g., MediaRecorder or EthoVision XT) on the PC.
2. Start the Basler Pylon Viewer software that comes with the camera.
- NOTE The Basler Pylon Viewer software is installed automatically when you install the camera drivers. The icon will normally be on the desktop. Otherwise, look in the start menu under Basler.
3. Choose Tools > Options and check that the User level is set to Expert or Guru.

4. In the Devices panel, double-click the item Basler under GigE or USB depending on the camera you have.
5. In the Features panel, open the Basler camera item and then double-click Acquisition Controls.
- NOTE If you do not see the Features panel, go on the menu to Window and make sure the Features option is checked
6. Makes sure Exposure mode is set to Timed
7. Make sure Exposure Auto to set to Off.
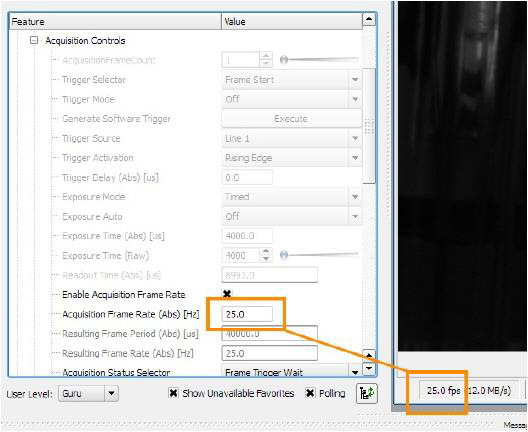
8. Set Exposure Time (Abs) [us], enter the exposure time you require, in microseconds. Press Tab or click another field to confirm.
- NOTE A higher exposure setting will result in a brighter image, while a lower exposure setting will result in a darker image. However, too-high exposure will result in dropped frames, and too-low exposure may result in an image that flickers or changes rapidly between light and dark.
For non-DanioVision set-ups, this value will typically vary between 8,000 and 25,000 depending on your lighting needs and your Gain setting in Pylon (more on Gain below). You can reduce the value below this range if the image is too bright, but don't exceed 25,000.
IR lighting is the exception to the above. When tracking in IR with an NIR GigE camera, you may need an exposure setting around 30,000 in order to brighten up the image enough for tracking in EthoVision. You may need to reduce the frame rate if you use such a high exposure.
For DanioVision setup, values should be 4000 (with a camera resolution of 1280x960) or 2000 (with a camera resolution of 640x480).
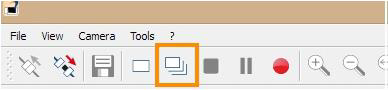
9. To check that the exposure time is compatible with your frame rate, click the Continuous Shot button on the toolbar.
10. At the bottom of the live video window, locate the frame rate resulting with the new exposure time. This should be the same as the one next to Acquisition Frame Rate (Abs) [Hz]. (Noldus recommends 25 or 30)
11. If the resulting frame rate is lower than Acquisition Frame Rate (Abs) [Hz], then either:
a. lower the exposure time (this will darken the image) and instead raise Gain (Raw) (under Analog Control; this will make the video image brighter),

b. open the lens diaphragm (aperture) to compensate for this (if not done already), or
c. lower the video resolution. This is under AOI Controls and can be reduced by lowering the Width and Height. This will help if your exposure setting is close to the limit, but if the exposure is very high, changing the resolution will not solve this on its own.
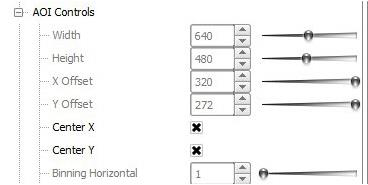
- NOTE Lowering the resolution will make the image look more “zoomed in”, it will crop the image to the selected resolution. Also, make sure the Center X and Center Y are checked or else the cropped image will be off-center.
d. lower the frame rate. Note that you will also need to use the lower frame rate in EthoVision. If your frame rate selected in EthoVision is too high for your exposure setting, you will see high numbers of Missed Samples or Interpolated Samples in EthoVision, indicating that the camera is not providing the correct number of video frames.
Repeat steps until you see the expected framerate.
12. Once finished, stop the Continuous Shot

and open the Configuration Sets item and:
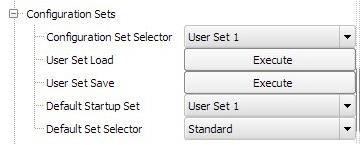
a. select User Set 1 from the Configuration Set Selector,
b. click Execute next to User Set Save (the camera settings set in the previous steps are now saved under User Set 1),
c. select User Set 1 from the Default Startup Set list,
d. close Pylon Viewer.
- NOTE These settings will be used each time you start up your Noldus software.
TIP You can also save different settings for the same camera in User Set 2 and User Set 3. Under Default Startup Set (User Set Default), select which you want Noldus software to use.