Missing data in EthoVision XT
When the video, camera, or detection settings are not optimal, you may encounter gaps in EthoVision data. Indications of missing data will appear as:
- High values for missed samples, interpolated samples, or subject not found.
- Gaps in the graphs shown in the integrated visualization.
- Gray segments in the track visualization.
- Total time spent in the arena may be less than the duration of the trial.
- Dashes or asterisks appear in the sample list in the track editor.
It's always best to identify the underlying cause so it can be addressed.
Missed Samples, Interpolated Samples, and Subject Not Found
Counts of these three types of missing data appear at the bottom of the screen in the Detection Settings and Acquisition. Values will appear in red if they are very high (as shown for Subject Not Found here).

You can also check them after the fact in the Trial List by clicking Show/Hide in the upper right corner, then pick Variables, and check their respective checkboxes.
Missed Samples
A missed sample indicates that EthoVision was unable to analyze a given frame from the video.
Tracking live
When tracking live, a missed sample often indicates the camera did not provide the expected number of frames. This can occur when there is a poor connection to the camera (e.g., any USB webcam, or a poor quality cable connecting a GigE camera). It can also occur if the Exposure setting is too high for the camera. If you are using a Basler camera, especially in dark conditions, please see Changing the exposure settings for Basler cameras.
Missed samples can also occur during very difficult tracking tasks (especially multiple animals, color tracking, and behavior recognition) if the computer is unable to keep up. The following contribute to increased load:
- Differencing as the detection method
- Color marking as the detection method
- Multiple animals per arena
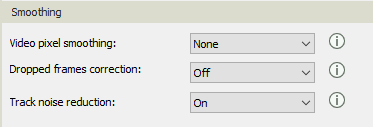
- Video pixel smoothing (in the detection settings) set to High. (Settings of low or medium are much less computationally intensive.)
- Animals that are large relative to the image
- High sample rates. For normal tracking of the nose, center, and tail, it's not necessary to exceed 25-30 samples per second.
- Very high resolution video
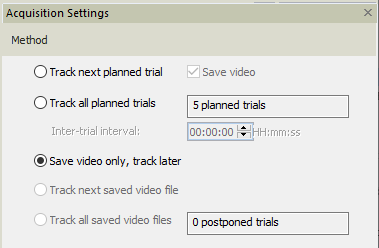
If tracking is too much for EthoVision to keep up with on your computer, you can use the "Save video and track later" option in the acquisition, then pick "Track next saved video file" to track afterwards.

Tracking from video files
If you are tracking from a video file, check that the DDS checkbox is checked (in the Acquisition, to the right side of the video controls). In this case, EthoVision will track the video at the fastest speed it is able, so there is never a concern about keeping up.

With DDS checked, you will only see Missed Samples if the video itself has missing frames, or if the frame timing is erratic. This must be solved in the recording software. If your software (or video converter) has a setting for a fixed frame rate, it should be selected (not a variable frame rate).
Interpolated Samples
If you have enabled the Dropped Frames Correction (Missing Samples Interpolation) setting in the Detection Settings, when EthoVision encounters a Missed Sample, it will interpolate the results. This does not result in a gap, and is acceptable if the number of interpolated samples is low (<1%), but if the number of interpolated samples is high, it has the same underlying causes as Missed Samples and should be addressed the same way.

Subject Not Found
This indicates EthoVision was not able to locate the animal within the arena. Any Missed Sample will also result in Subject Not Found, so if you are seeing both, focus on the Missed Samples issues. If you see only Subject Not Found, either the animal was not visible in the arena (e.g., there is no animal, the animal escaped from the arena, or the animal is hidden for example inside a shelter) or the detection settings were not adequate to locate the animal. Adjust the detection settings accordingly.
Smoothing and Interpolation
If the number of missing data points is low, they can be addressed by either interpolating the missing points or by using track smoothing, which will also fill in short missing segments.
Interpolating missing points
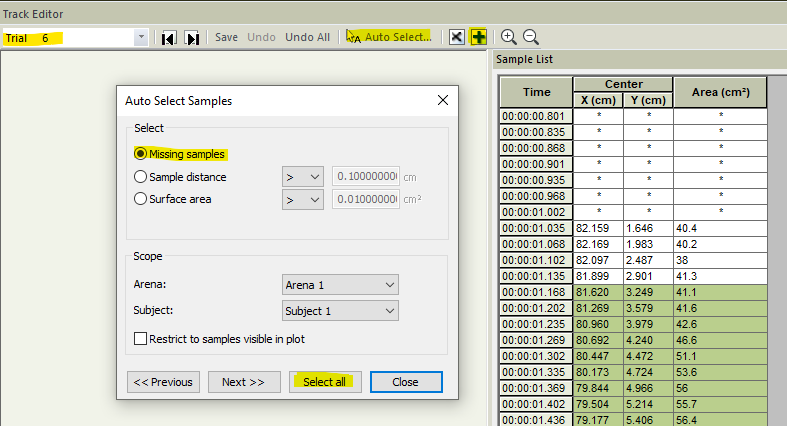
To interpolate missing points, go to the Track Editor (found under Acquisition) and select the track to interpolate (in the upper left corner). You can either select the entire track (e.g. click the first data point in the sample list, then go to the end of the track and hold down the shift key while clicking the last data point) or use the Auto Select function. For the latter, click Auto Select, pick Missing Samples, then Select All. Once the data points have been selected by either means, click the "Interpolate Selection" button (with the + symbol) or press ctrl-i. Any missing data points will be interpolated based on the last and next known position of the animal.
Note that points shown with an asterisk (*) are prior to the start of the track (before the start conditions in the trial control have been met) and cannot be interpolated. Also, because interpolation fills in data between the previous and next known location, it cannot be used at the very start of the trial (where there is no previous location) or at the very end (where there is no next known location).
Interpolation must be done separately for each trial. You can undo the interpolation by returning to the track editor, selecting the track, and clicking the Undo All button.

Track Smoothing
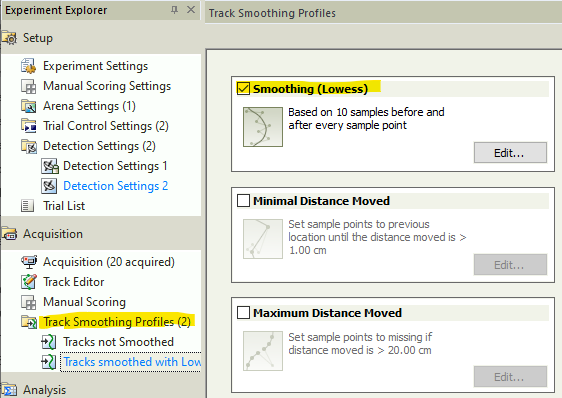
Track Smoothing, which is found in the Track Smoothing Profile (also under Acquisition), averages each data point based on a number of points prior to and subsequent to that point (by default 10 points before and after). It will also fill in small gaps. Track smoothing has the advantage that it can be turned on with a single checkbox for all trials, and can be removed just as easily. To get a sense of the effect of smoothing, compare the trial visualization with and without smoothing.

Redoing Trials
If the number of missing data points is high, especially if it is due to poor detection settings, it may be preferable to redo the trial from the recorded video (if one was created). Please see Redo a trial in EthoVision XT for more details.