Camera is not detected in CatWalk XT 10.6
When CatWalk opens, the camera status will be shown in the lower right corner. If it displays "Camera detected: No," the camera has not been detected and it will not be possible to configure the camera or proceed with acquisition. You can, however, proceed with classification or analysis (which do not require the camera).
The camera may not be detected if the camera has no power, the camera is still establishing a connection to the PC, the camera is connected to the wrong port, or the configuration is not correct.
Basic requirements and reconnecting
For the camera to be detected, the camera must be powered on, plugged in correctly, and ready before the CatWalk XT software was opened. Note that it may take up to 2 minutes after powering on the camera before it is ready. If you have corrected the issue, you can go on the menu under Setup to Camera, select your camera (it should be listed as Gevicam), and click Refresh. Closing and reopening the CatWalk XT software should also correct this issue.
Camera has no power
The CatWalk camera receives power from the Control Unit which is mounted at knee level on the left side of the CatWalk frame. The power switch on the left side of the Control Unit must be turned on, and the power cable for the Control Unit must be plugged in. The green and red lights on the walkway should be on. If your CatWalk has a power switch at the left side of the glass plate, this switch should be turned on at all times (newer CatWalk systems do not have this switch, they only have a switch on the Control Unit).
When you turn on the power on the Control Unit, you should see the indicator LEDs on the right side of the Control Unit flashing for a short period of time. Once the Control Unit is on, these LEDs will turn off. So, it is a concern if they never turn on at all, but it is normal if they are off while in use.
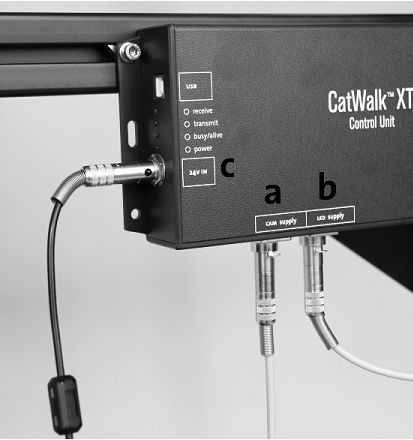
This picture shows the Control Unit from the back (this is the side facing the wall). The power cable from the camera plugs into "Cam Supply" marked "a" in the picture. The indicator LEDs are on the side.

It will take 1-2 minutes for the camera to be recognized after it has been turned on before the CatWalk software will detect it. Closing and restarting the CatWalk software after the camera is ready will resolve the situation.
Please note that the CatWalk walkway lights take up to 15 minutes to reach full brightness. The walkway should be turned on at least 15 minutes before it is used to set the detection settings or to acquire any runs.
Camera is connected to the wrong port
There are two cables connected to the camera. There is a tan cable which ends in a round metal plug, which should be plugged into the Control Unit (in the Cam Supply port labeled "a" in the image above). There is also a network cable which should go to a port on the back of the computer labeled "CatWalk Network". Do not plug the network cable into a port on the Control Unit; these are not network ports and will damage the camera.
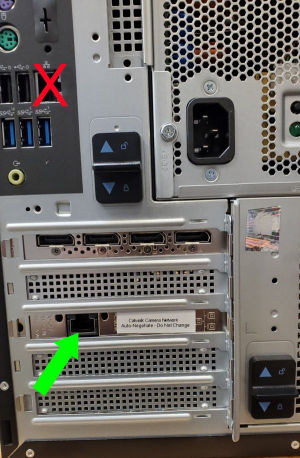
Computers provided by Noldus will have two network ports. One port is higher and located near the USB ports; do not use this port for the CatWalk camera, it is for use with your local network (if any). The other is lower and in the area with the metal slots, and will be labeled for CatWalk. Plugging the camera into the wrong port will result in it not being connected.

When the camera is connected to the PC, there should be a green light where the network cable plugs into the back of the camera (facing the floor). This indicates connectivity to the computer.
Camera settings
You can test the camera directly. Close CatWalk, then go to the start menu and in the programs list find the Pleora Technologies folder, and then GEV Player listed in it. Click the Select/Connect button. You should see a window displaying a list of your network adapters. One should be labeled as the eBus Interface with a device listed indented beneath it. Select that device, click OK, then click the Play button. If you see an image from the camera, it is likely to have solved the underlying problem. Click Stop, close the GEV Player, and test the camera in CatWalk again.
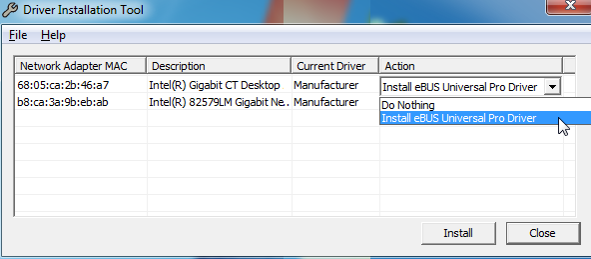
If it is still not working, return to the start menu and Pleora Technologies, then pick Driver Installation Tool. You will see a window like this:

There will be one line for each network adapter in the computer (usually two). If the eBus Universal Pro Driver is not already selected for the Intel Gigabit CT Desktop adapter, select "Install eBus Universal Pro Driver" under Action, then click Install. Allow it to complete, then close it and restart the computer.